


Post by Star ★ on Feb 2, 2008 16:46:29 GMT -5
Petz Image Editing Tutorials.
PSP(Paint Shop Pro)
PSP(Paint Shop Pro)
As the creative corner is getting more and more tutorials added, it has been decided that the tutorials will be grouped. This section is for PSP tutorials.
These tutorials were written by various member of RKC and full credit goes to them. The member who wrote each one is stated at the top along with the PSP version it was written for...
Glow Effects
Tutorial written by: Chaotic
PSP Version: 8
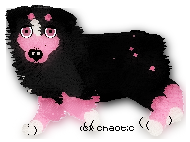
Take an ordinary picture and turn it into this:
Here's how:
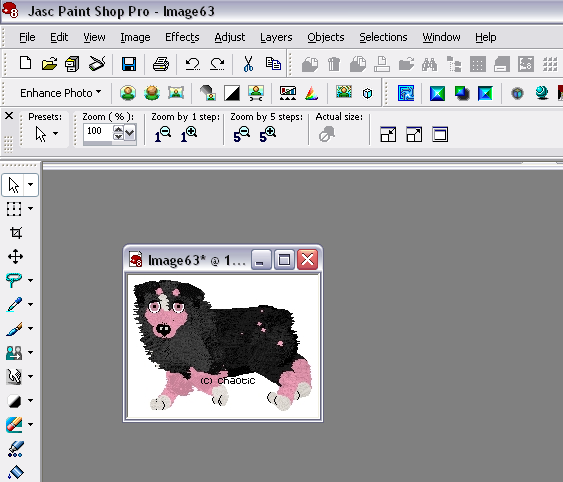
1. Open the petz image you wish to work with.
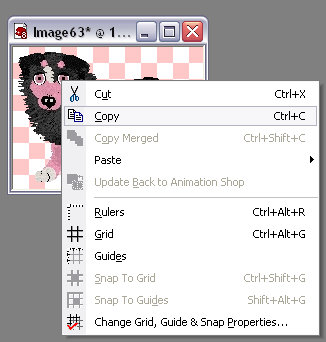
2. Right click & copy the image.

3. In the grey area, right click again and paste the copy.
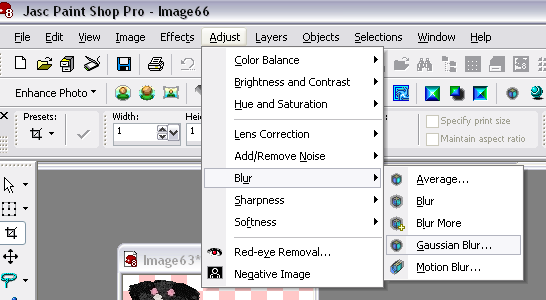
4. On either of the copies, it doesnt matter which, go to your menu bar and click adjust - blur - and select gaussian blur.
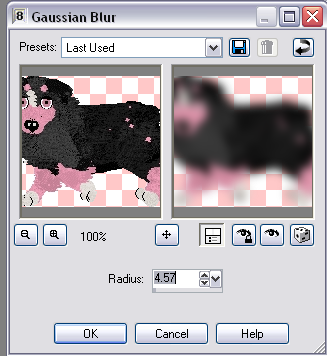
5. A pop up should appear. Set the radius to 4.57. Then click ok.
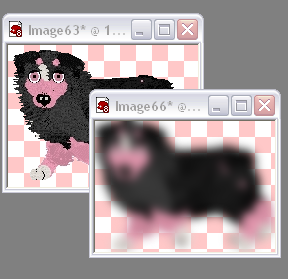
6. Now one of your images should be blurry and the other should be normal.

7. Right click and copy the blurry one.
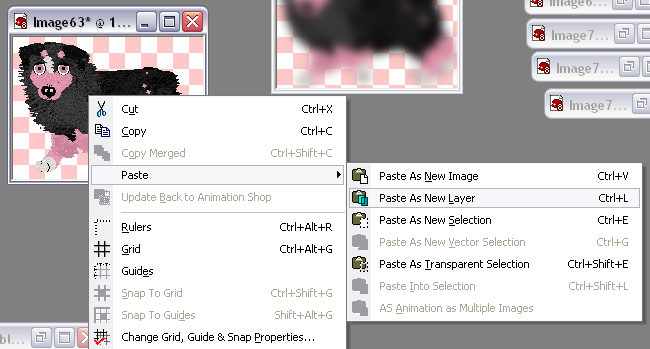
8. Right click on the normal one and select paste - paste as new layer.
9. You can x out of the original blurry picture. NOT the one you just pasted it on to.
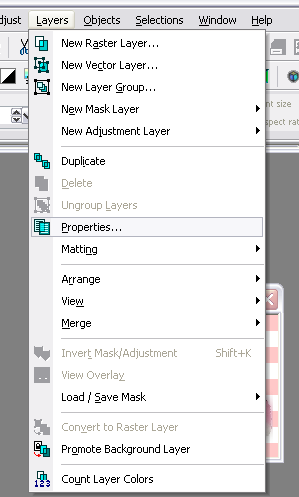
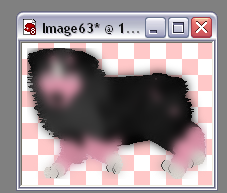
10. Go to the menu bar and select layers - properties.
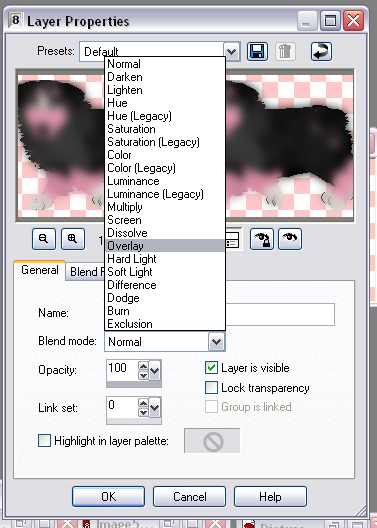
11. Select the overlay fromt he drop-down list and then click ok.
12. And here is your finished product. This effect also looks really good on regular pictures.
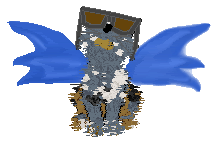
Wings
Tutorial written by: Bizarre
PSP Version: 7
Well, here's a little tutorial, I hope its useful. I know I have a lot of fun editing petz pictures, and drawing them wings is my favorite thing to do. I use photoshop, but I'm sure paint shop pro works just as fine. You should preferrably already know how to "smudge".
Steps/Instructions
- First, open up the petz picture
- Now, copy and paste the picture into a new image, the new image size should be around 400 X 400 so you have lots of space.
- Next, click on the pencil tool, you will want the size to be around 1 or 2 pixels.
- Once you've got that set, zoom in on the picture to, lets say 200%.
- Now, carefully draw the outline shape of the wings on your pet.
- Next, use the paint bucket and fill in the wings with a slightly lighter shade than you used for the outline.
- If one wing is behind the other, as in the case of a pet facing sideways, for the father wing, you should make the colors a little darker or lighter, whichever you prefer.
* This is what I have so far:
- Now, choose a slightly lighter and a slightly dark color and draw some little lines on the wings, like this:
- Next, you want the colors to blend together and have soft, fuzzy feel. So choose the smudge tool.
- Use the smudge tool to soften the edges and and blend the lines you drew together. Now it should look like this:
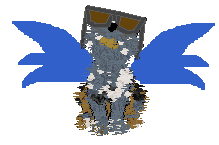
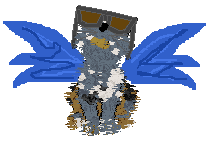
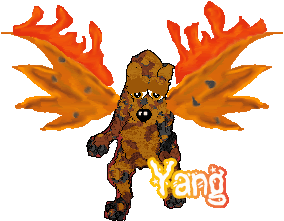
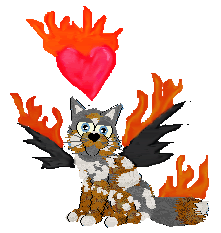
And there, your pet has wings! But, to make it more interesting I usually add some extra touches, like fire or water, maybe some sparkles too. Here are some final versions I have:

- Added rain drops to the wings
----

- Added sparkles
---
Here are some previous ones I have done to give you some ideas...

Smudgies
Tutorial written by: Majik
PSP Version: 7
1. Get a good paint program. I use Jasc Paint Shop Pro 7.
2. Get a petz picture and make sure it's 256 colour (24-bit).
3. Soften the entire picture, apart from eyes, nose, anywhere that isn't fluffy.
4. Smudge the edges of the pet to make it look like fur, and anywhere you think it would look good.
5. Add highlights and shading.
Everyone has their own personal touch they put into a smudgie, but that's the way you make them. I can't really go into great detail here. Maybe I'll do a full tutorial one day and put it on my site...
Transparency
Tutorial written by: Rach
PSP Version: 7
Welcome to Rach's Transparency Tutorial! Here is a quick, simple and [hopefully] easy to follow tutorial on getting those pictures transparent. I am using PSP 7, I'm sure its basically the same for Other Versions. I am also using a Petz Picture...as this is a petz help site, I thought it would be relevant. Onto the tutorial.
Open your petz picture, which is not yet transparent.
Select the Fill Bucket tool, which is on the bottom left hand of your screen:
Using The Colour Pallete, Click on a colour that dosen't feature on your petz picture, lets say...a nice green:
Hopefully, you still have your Fill Bucket tool, click on the petz white background, it should have a nice green [or whatever colour you used] background now.
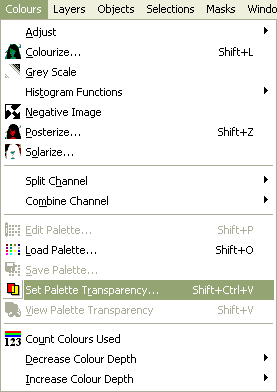
Then, using the guide above, make your way to 'Set Palette Transparency'
You should get a little warning box:
Check the box saying 'Don't warn about this anymore', you don't need to worry about this, then click 'Yes.'
You should then get another box, as below:
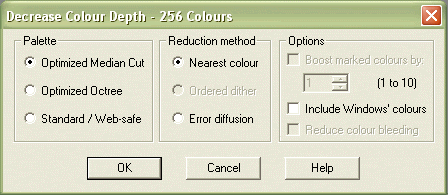
Check 'Optimized Median Cut' and 'Nearest Colour' and click Ok.
Another window will pop up after that, 'Set Palette Transparency
Hover over your petz picture, and click our lovely green colour, and click ok!
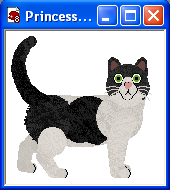
Thats it! After saving your file [make sure its saved as GIF or PNG!] you have a transparent image! Look at my new spiffy transparent petz picture:
Now you can use your image on all backgrounds and it won't come up as a horrible white background =D
Adding Shading To Eyes
Tutorial written by: Kale
PSP Version: 7
This tutorial covers adding highlights, shading, and sparkles in the eyes.
I use Jasc Paint Shop Pro 7, but it applys for PSP 8 and 9, though the buttons and the options are in different places. For people using Adobe Photoshop, the method is exactly the same, except for different tools. The tools are at the bottom of the post.
NOTE: This is how I make sparkly eyes. This doesn't make it the correct way, and many people have different techniques/methods. Feel free to adapt my way to get your own style.
---
Step 1 : Open any petz picture you would like, with a clear view of the eyes. It is best to get a picture straight from the PetzPix folder, as there will be no need to start changing formats and colours. I will choose this picture:

Step 2: Select the retouch button. (The one below)

Step 3: Make sure the retouch options are set as below, or around those numbers. As we are lighting the eye first, make sure it is set to Lighten RGB.

Step 4: Zoom in to the eyes, and draw on them as you would normally, and the highlights appear!

Step 5: From the drop down menu on the retouch options, click Darken RGB as we are now going to darken the eye.

Step 6: Make sure the options are set as below, or around those numbers.

Step 7: Again, draw on the eye as you would normally, and shading appears! Almost done.
Step 8: Select the paintbrush button (the one below)

Step 9: Make sure the paintbrush options are set as below, or around the same numbers.

Step 10: Where it says "style", the top box is the colour that you are going to use. Change it to a whitey colour.

Step 11: Draw on the eye a large white spot (on the side with the highlight) and draw on the eye a small white dot (on the side with the shading).

The Finished Result! You now have a picture of your pet with sparkly eyes!

Double Border
Tutorial written by: K r a z y K i t t y
PSP Version: 8
Okeydokie. As you all know, outlining is popular. Double outlining is almost as popular. It took a lot of exploring for me to figure it out. So to save you the trouble, I made a tutorial. This is the way I do it, different people have different ways of doing it, but personally, I like my method. It's easy, but it may not be the quickest.
I have ~no~ idea whatsoever about any other program, as I use and love PSP8 only. You can try it with another program, but don't blame me if you get lost.
Step1: Open your image.
Step 2: Select your Magic wand tool.

Step3: Select on all of the white space in your image using the normal settings.
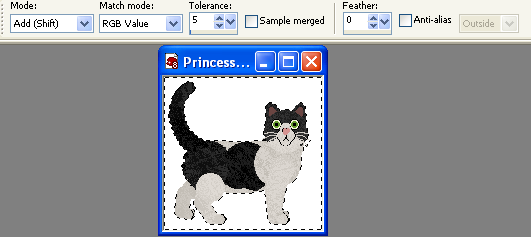
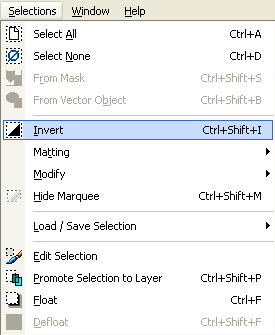
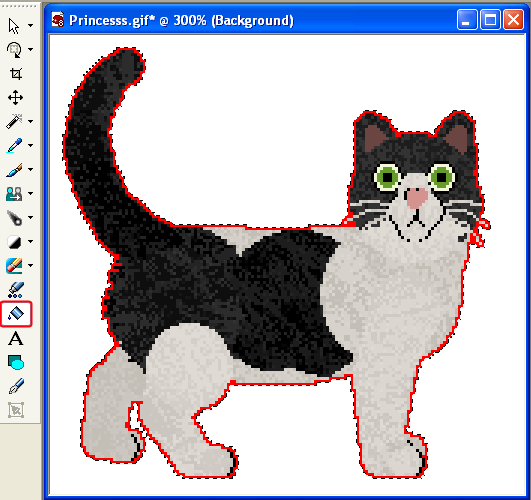
Step 4: Select "Selections, Invert"
Your image should now look like this:

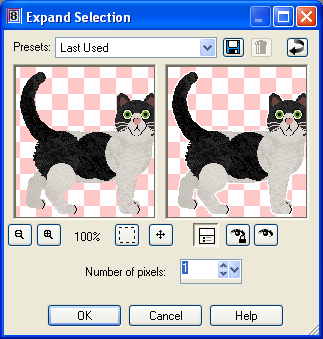
Step 5: Select "Selections, Modify, Expand"
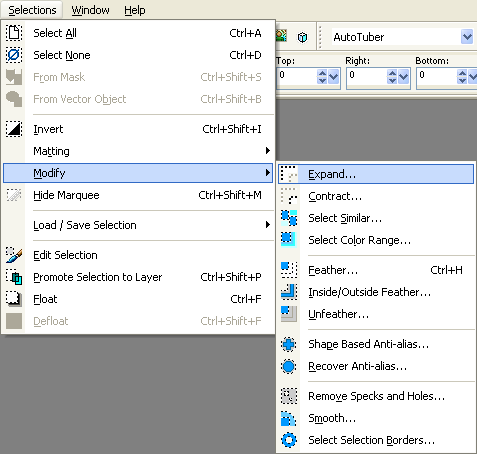
A new window should pop up. Use these settings:
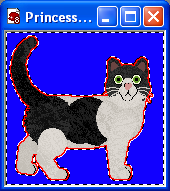
Step 6: Choose the colour that you want the first outline to be. I chose red. (#FF0011) Choose the FloodFill tool and flood the white part of your selection. (zoom in if you have to)
Step 7: Invert your selection again. "Selections, Invert"
Step 8: Choose the second border colour. I choose blue. (#1100FF) FloodFill the rest of the white selection the colour you chose.
Step 9: Zoom in to make sure you didn't miss any parts. I missed a part between the leg, see?
Lets fix that up.

Step 10: Now we need to invert your selection, yet again.
 "Selections, Invert"
Step 11: Expand your selection again, using the same settings. "Selections, Modify, Expand"
Your image should look something like this:

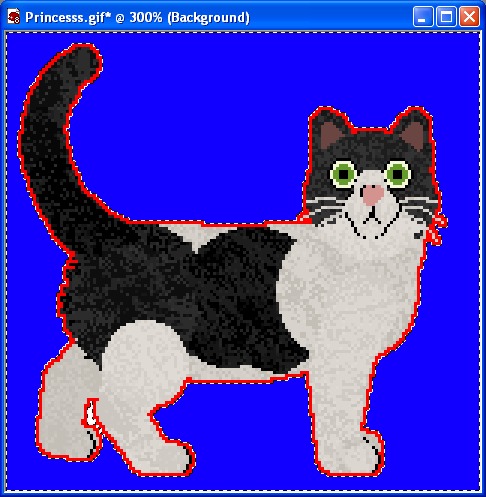
Step 12: Copy your image. "Edit, Copy"
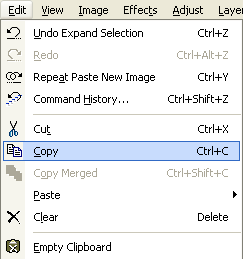
Step 13: Paste your image as a "New Image"
Step 14: Voila! Your double border is complete! You can now close your original image.
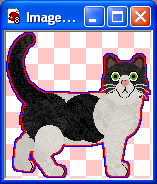
I hope you find this tutorial easy to follow. Please, post your outcomes!
Thank you, to all of the members who took time to write these tutorials. I hope you don’t mind me added them to this thread.
If anyone has written a tutorial they think others will find useful, then feel free to post it

Star


 If so, I apologize. Hello all, my comp got seriously oofed, and I just got it back with a clean bill of health!
![[crazy]](http://storage2.proboards.com/216663/images/sqwDNEIwfT0TqkYjYzUf.gif) fixed a whole bunch of little issues in both my games. I feel behind the times
fixed a whole bunch of little issues in both my games. I feel behind the times